Sprouting Strawberry seeds from organic strawberries: An experiment. It’s elementary, my dear Watson!
Posted on: July 29, 2013
Well it’s been a while for me here on the ole’ blog. Teething has made its grand return in our home with FIVE teeth cutting at once- including two molars!!! Ah!! Insert crazed momma with a dozen frozen chews for baby and countless bit fingers HERE.
A few weeks back I had a pack of organic strawberries in the fridge that sat there a while until they began to shrivel up. There were only three strawberries left, so it wasn’t a total loss. The perk of it was that the seeds began to stick out and popped off easy, so I got an idea: LETS GROW STRAWBERRIES NOW!
Cue elementary science experiment. Do you remember sprouting beans in plastic baggies in the window sill? Essentially I did the same thing.
After rubbing off the seeds with my thumb and nails (some major nail cleaning afterwards), I left them in a bowl to dry out for a few days. Then soaked them in some rain water for five days in the window.
Now we get down to the “science-y” part. (That’s a word, right? haha.) I took a paper towel in a plastic baggie and poured the soaked seeds semi-evenly and sealed it. Then taped it to a very very sunny window in the lanai (“three season” room for you northerners), and let nature take its course for two weeks.

Basking in the glow of the Florida sun!
The sprouts took almost 1.5 weeks to start to show, but they were so exciting to see! Generally speaking, smaller seeds might sprout slower and smaller than a larger seed (like bell pepper, for example).

Such tiny little sprouts.

Grow, babies, grow!
Then I started to get nervous about the bag molding so decided the 1-2″ sprouts were ready to transplant!

Cutting the bag open.
Couldn’t slide the wet paper towel out without it shredding or messing with the sprouts, so I had to cut the bag open. A few of them came off on the other side of the plastic

Sprouts stuck to the bag. Is it just me, or are they super cute??? 😀

Sprouts at two weeks

New home
You can really see how small the little green sprouts are in this pot. It’s maybe more than 12 inches across.

Soooo tiny!
I poked a small hole in the pre-watered organic soil with my pinky nail, placed the root in, and gently pressed the soil over the little roots.
Sometime in the next few weeks I expect I may loose a sprout or two due to the “transplanting stress” they sometimes encounter, or if we don’t have squirrels come by again (grr!), but they seem to be doing great now four days after transplanting!
In other parts of the country it might be too late to be planting strawberries, but in Florida, it’s the rainy season! A LOT of things are growing wonderfully in my garden with all this sun and rain.
So, there you have it! harvest, dry, soak, sprout, plant, water, wait, and wait, and wait, and EAT! Oh the count down begins until I’m growing my own yummy strawberries. NOTE: this can also be done with virtually any other seeds when sprouting outside isn’t an option just yet (frost risk, a lot of critters, too much rain- could wash away small seeds…etc) and then you can plant in small pots indoors, and transplant when ready/outgrown indoor containers.
SAVE YOUR SEEDS! You could wait until next season to plant by harvesting from your ORGANIC fruits/veggies, cleaning all remnants of fruit/veggie off the seeds, let the seeds air dry for a few days, and store in a dry envelope. Just like the ones you buy at the store/online, but FREE and ORGANIC! 😀
Cheers!

Yummmmm!
Your welcome for getting that song stuck in your head! Trust me, looking up the video in the hopes that “listening to it will get it out of my head” doesn’t work! Oh, the horror!!! Oh, the madness!! Oh, the zoot-suit faze of the mid-90’s!
Well, I hope you all had a fantastic Independence Day here in the US! (and a lovely…uh, Thursday to all my South African family!) 🙂 We enjoyed some family time with my parents and nana in the morning, wore ourselves out swimming with little man in my parents pool, and then joined our friends for some board games in the afternoon. Fireworks, you ask? Oh, no. Not for this momma. Not this year, at least. Too many mosquitoes, too loud, no parking…. Maybe next year when little man wouldn’t freak out if he stayed up past his bedtime to watch, we’ll try heading out. I didn’t mind missing them this year, though. We stayed in, dragged the futon mattress to the lounge (US: Living Room) and watched a marathon of Heroes on Netflix. A good night, indeed!
So what have I been up to lately in the garden? Well here’s where my heads been at (in between all the rain and lightening)…
Ever wondered if (or even how) you could replant any of those lovely herbs you see at the farmers market with their roots still attached? Well, you can! Well, –er, usually. They have to be fresh, healthy, and have enough root and green parts to sustain transplanting in order to have an easy go at planting them. This is a great way to start off or add to your self sustaining urban garden, and a great and easy way to have fresh herbs every day! So– here’s what you do!
STEP ONE: Choose a healthy and yummy herb that you’re likely to use. (don’t bother planting parsley if you can’t stand the smell of it!). I chose chives, also known as “green onions”, which are great in soups, salads, and any dish you’d like to add a mild garlic or onion type taste to. Plus, they add a lovely green to any dish!

STEP TWO: soak the roots indoors in water for a few days. I collected some rain water from my watering can that’s always full of rain water. You can use other waters, but natural rain water is the best in my opinion.
STEP THREE: wait. {tick, tock, tick, tock…} about 4-7 days depending on the plant. My chives took 4 days to look like THIS–
Ready for their closeup::

Look at all that growth! Woo hoo!!! TIME TO PLANT!
STEP FOUR: gather supplies. Organic potting soil or a mix with native soil (which is what I chose)/ a ready planting site or pot, gloves (if you’re a sissy like me and don’t like getting your nails dirty), and your fresh herbs.

STEP FIVE: dig out a little hole for the chives to enter and place the chives in and cover the roots with soil loosely. To keep mine upright I covered them up about 3/4 inch above the roots, and then lightly patted down the soil to give it some soft stability. They ended up being covered about 1/2 inch above the top of the roots.

Gently arrange them so they seem stable and not too crowded.

Top shot (don’t mind the dirty deck to the left, venus fly trap to the top, and crazy out-of-control cilantro to the right.)

And here are my beauties.

Now to let them adjust to their new home for a little while. I’ll start trimming/ eating them in a while once the roots have taken solidly to the soil. Not sure how long that will be exactly. I’ll just use a tactile test (i.e. wiggle them a little bit to see if they’re secure yet or not. :-D). I’m guessing a week or so, since the roots grew so quickly in just the water for four days!
How do I harvest my chives?
Chives have two edible parts, the flower and the green stalk/leaf part. When you need some chives, to ahead and use garden shears (or pinch nicely with thumb nail) close to the base but leave some green (an inch or more) so the plant can photosynthesize and regrow. I’ve read they freeze well, but have not tried it. Also read that they don’t dry well as the flavor doesn’t hold up well– but I haven’t tried that either.
Hope that helps you out with planting your own herbs or inspires you to try something new for your urban garden. They do need a good amount of sunlight, so a well-light patio or sunny windowsill would work nicely for these. Don’t think just because you live in a condo or apartment that you can’t have your garden! Don’t have a patio or sunny window? See if you can’t have a few of your own or even “shared” potted herbs outside your apartment building or on the roof! Maybe your neighbors would love to share them with you, and let you keep them on their patio (if they’re friendly, and don’t mind giving up a little patio real-estate for the yummy-ness,– don’t be too presumptuous, though!) 🙂
Cheers!
So far I’m LOVING growing my own little urban farm in my yard. Okay, so Old MacDonald doesn’t address his post to my home (yet!) but it’s coming along nicely. I get such a proud momma bear grin when I check on them each day. Now with (at least) another four more weekends of work left to clearing out the yard before we can plant permanent planter boxes around the perimeter, my patio is gradually becoming overrun with pots!
Here’s a quick pic of what we’ve got so far on the corner of the patio. Please ignore the dirt, leaves, weeds, and toppled lattice (which I was using to keep the squirrels out of the herb box a few weeks back). I never claimed that this was an “attractive” set up, now did i? 😀

Normally this time of year I grunt and grump about all of the rain we get in South Florida, but this year it’s fantastic for my plants! They’ve been able to enjoy all this natural rain and grow so quickly.
The habanero, eggplant (tiny sprout), cilantro, thyme, and MASSIVE basil (seriously, check that out!) were all started from organic seeds. It’s so easy to soak and sprout indoors. Transplanting is the tricky part, because the sprout experiences stress, and doing it too early or not in the right conditions (good soil, enough water…etc) can kill them off quickly. HENCE the vacant pot. That’s what happened to my red bell pepper sprouts. I’ve grown them before, so I should have known better. They were transplanted too high, and washed out with the rain, then died off in just two days after transplanting! So sad. They could have been fantastic by now.
The pineapple was the top from a fresh pineapple last November, and a gift from a fellow blogger (faithcryan.com @BabyStepsForGrownUps). So excited to enjoy some fruit from them, but they do take quite a while to start to bear fruit. Mmmmmm…. waiting, waiting, waiting…. *drooling* 🙂
The roses were a gift from the Mr. one random day; an “I appreciate my baby momma” gift a few weeks back. They had to transplant quickly because they were overgrown on their pot the day he bought them! So I gave them a new home and they’re very happy now. Just around the root ball I put two (previously frozen) organic banana peels, as they are apparently very good for rose bushes (gotta love Pinterest for the random bits you learn, eh?). Seems to be proving true as the bush doubled in size in a few weeks. No new blossoms since the old ones died off in the original pot. *fingers crossed* Lord, please soon!
It’s a good feeling to start to “live off the land”. Granted, we’re nowhere near that just yet, but starting! As the weeks go on this year we’re going to continue to save my seeds, start herbs and give away as gifts, and continue to work on growing my “kitchen”!
SAVE YOUR SEEDS!
I encourage you to save your organic seeds from your food items and plant the easy ones to start. Tomatos, bell peppers, (any pepper, really), or even buy a packet of organic (non Monsanto, do a quick google search on which are good to support) and start indoors. Remember to give them a safe, warm, moist home in a small container or cup, and give them time!
Sometime soon we will want to start on a rain barrel and a compost bin, but only once we find the time. I know once that’s up and running the plants will absolutely love their water and food. And what a way to recycle, right? How many of you have built your own compost bin and rain barrels? Was it difficult to set up with the gutters? Did you encounter much compost “stink”? Lets start a dialogue if we can!
Cheers!
Quick vegan puff pastry recipe!
Posted on: July 2, 2013
Pretty much every week I end up making a vegan pot pie. Not a small one. Not medium. We’re talking a lasagna-pan-sized pot pie! It lasts for a few days, and reheats quite well. Now such a monster order requires a large amount of puff pastry crust, and I’ve always ended up using the Pepperidge Farm frozen puff pastry. Although it is “vegan”, the long list of non-organic ingredients makes me cringe. After many pinterest searches (viewed countless recipes, and did my own trial-and-errors. This is my own recipe), and a few failed attempts, I’ve narrowed down my recipe to make an awesome fluffy and flavorful puff pastry thats organic, vegan, easy, doesn’t take a full day to make, and LESS THAN HALF the cost of the Pepperidge Farm one! BAM! This can be used for breakfasts with some vegan breakfast fillings (or eggs– not vegan, I know, but that’s another story for another post.), cut into squares and wrapped around a lovely fruit and jam, fill with chocolate or cream, or to make any number of savory pies (pot pie, shepherds pie…etc)
Here’s what you’ll need for one large crust (or one batch for small pastries):
Ingredients (Organic, of course!):
- 2 cups all purpose flour + more for rolling
- 2 half sticks of vegan butter softened (or 16 tbsp vegan spread)
- 1/4 cup water
- 2 Tbsp sweetener (maple syrup; agave; I used local raw honey)
- 1 tsp salt
- Add flour, butter, salt, sweetener and to blender (I use my Ninja) and pulse a few times to break up softened butter.
- Add half water and blend a few seconds until dough begins to form. Add remaining water and blend for another 30-60 seconds until all ingredients mix and dough gathers around blade. NOTE: You may need to scrape off side of blender half way through if butter was not softened completely.
- Cover clean counter top with remaining flour; take dough out of blender; place dough clump on counter and form into a ball.
- (NOTE: Here is where the “baking finesse” some of you may have would come in handy.) At this point I floured the rolling pin and rolled the dough out to about 6×12. Then I folded it on itself twice (hot dog), and then folded the long sides up on top to form a square. Wrap the dough in plastic wrap and refrigerate for at least 30 minutes to set up. At this point you can freeze it for later use.
NOTE: This does not form true visible “layers” the way a Pillsbury dough might, but it does have some fluffiness. This is simply a quick, blender-made alternative to the long-labored traditional puff pastry recipes. Also, if you want to have an extra to freeze, try using the entire box (all four half sticks) of Earth Balance buttery sticks. Then, ou’ll have to double up flour, water, sweetener, and salt- that would yield two pies worth (top and bottom layers).

RECOMMENDATION: Stick with the vegan butter (not the coconut butter/spread. It was too oily and stuck to rolling pin no matter how much flour I added. I had to use wax paper to roll out and even THEN, it was impossible to roll out on the pie pan! Plus it just tasted like oil and flour. What a pain in the butt!). Don’t forget the salt and something to flavor it (i.e. sweetner)! You could add more sweetener if using for a dessert, or even some savory seasonings to give it some zest. Watch that you don’t throw off the wet/dry ratios too much though.
Today I made two batches from one box of the vegan butter (there’s four half sticks in a box of the Earth Balance buttery sticks), and I added 1/4 cup of flax seed meal to the one I used on the pot pie (shown below). The other (shown above) I left plain to be used for some breakfast dishes or desserts (not sure just yet).

Mmmmmm…. smells so good. And tastes even better! It puffed up all fluffy and nice, and delicious to boot! Cooks evenly, and browns up just right!
Well, there you have it. My second recipe post. 😀 I’m liking this whole “blogging” thing! Hope you enjoy!
Cheers!
Success! (kind of)
Posted on: June 25, 2013

Got my mini Mr. up from his nap and got him set up for lunch (leftover eggplant meatballs! yumm!), but wanted to let him try his raw carrot crackers first. Verdict: win and a fail. He loved them for sure. However, even when I tried them, they were a bit tough to chew without using my molars, and didn’t dissolve as well as I’d hoped. So next time I’ll try a few things, more fruit, more liquid, less drying time.
Since I didn’t lay it down completely evenly in the dehydrator tray, there were a few “thicker” and, therefore, wetter pieces. So I broke those ones up for him and let him munch away.
He loved them! And kept pointing to the table for me to put more on his tray- piggy piggy. 🙂
See he desperation for “more”?

Munch, munch munch…

Cheers!
So I got a little ambitious in the kitchen yesterday. I decided to juice some carrots and strawberries for little man (who turned 14 months this weekend!– insert mommy freak out here) and decided to get a little creative with the pulp
So I’m currently operating with the state of the art Juiceman Jr. circa 1995. Oh yeah- ballin’! But it gets the job done (sort of).

I never got a photo of little man with his sippy cup of juice because he grabbed the cup and ran away to chug it by the sliding door. He’s a goof- but LOVES his fresh raw juice!
Usually I just toss veggie pulp (bad, bad, I know!) and make fruit leather from the fruit pulp, but this was a combo of both, so I was excite to put it to use. I made raw crackers for little man. All of the “toddler” crackers in the store that tout being all natural, fruit, and veggie have WAY too many ingredients on the side for me. Plus, they’re mostly just wheat/flour and then a tad of veggie/fruit powder for flavor- not very much goodness going on there. 😦 These ones turned out quite nicely. I wasn’t too keen on the texture, but the Mr. loved them!
Here’s a shot of the pulp I was left with. It’s just organic strawberries (I leave the greens on) and carrots. Not so yummy looking just yet!
I knew I’d like to add some stuff to them so I grabbed my milled raw flax seed (used a milling blade in my blender on raw whole seeds- store in fridge) and the pineapple I got at the local farmers market over the weekend.

And the yum-a-licious pineapple!

I squeezed slices of the pineapple into the pulp before blending it up so it would get a little sweetness.
Then slap it on the teflex sheet in the dehydrator, put it on 105 degrees (low setting to keep it “raw”) and let it be for about 8 hours. Set it and forget it!
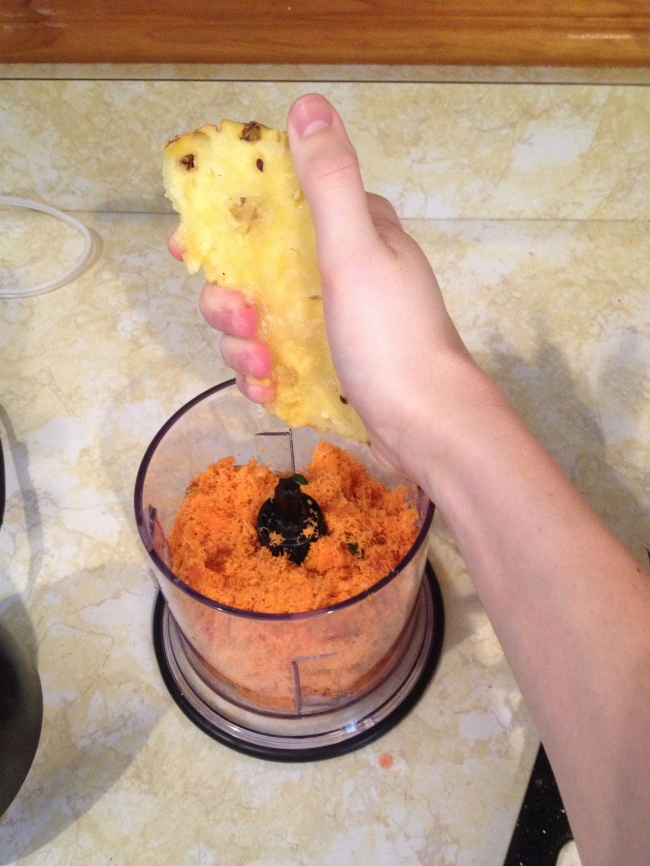

This was just a small amount of pulp, so it’ll just make a few crackers for little man (seen hanging out to the left of the dehydrator) but if I juiced for the whole family I could fill up a few trays with pulp. Make sure you score the pulp into cracker shapes first, so you can break them apart when it’s dry.
And there you go! I’m so excited for him to get up from his nap and try his new treat! 🙂 It’s such a good way to get raw whole foods into your diet and even added boosts of nutrition through any seeds or nuts you’d add!
Raw carrot/strawberry crackers:
-
fresh pulp of carrot and strawberry- or from favorite veggies and fruit (I had roughly 2 loosely packed cups)
-
roughly 1/4 cup fresh pineapple juice (for sweetness)
-
1 tbsp raw flax seed meal (or substitute any raw seeds)
-
Blend up pulp, juice, and seeds in blender until mixed. Add juice as needed to blend all ingredients. Don’t make it too wet or it’ll take a while to dry.
-
Spread blended pulp mix on teflex sheet in dehydrator. Score into cracker sizes.
-
Set dehydrator on 105, or desired setting for roughly 8 hours. Check periodically. You may need to use a spatula to flip them towards the end, to thoroughly dry bottom side.
-
Enjoy!
Think you’ll try it? Let me know what you think and how yours turn out!
Cheers!
Even though it’s been very rainy here in south Florida, the sun is brutal. Therefore I have to still water my little starter garden once a day just to keep things growing.
As usual, I had my little helper man join me and foreman the operation. He checks the Ph balance of the soil, the purity of the water, observes proper watering-can techniques, and that the twigs taste good. (Ew. haha)
Water check:
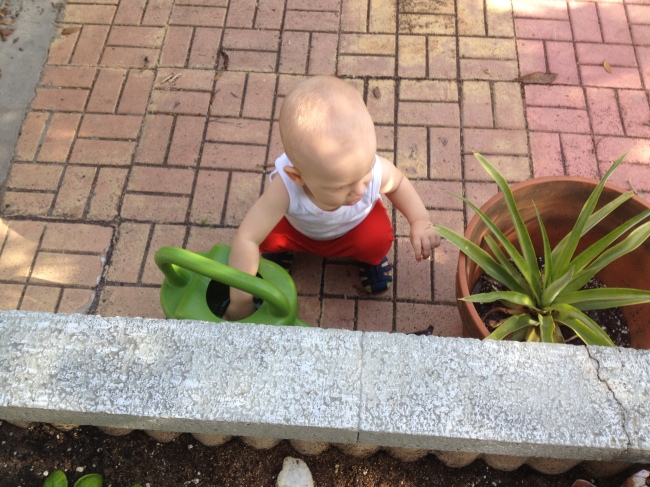
Measuring growth–

Checking the water– again–

My favorite–

I couldn’t have a cuter helper boy! Hope that brightened your day and brought a smile to your face!
Cheers!
Are we done yet?
Posted on: June 19, 2013
So, Kardashian had her baby this weekend, and instead of celebrating I was stuck doing more yardwork. It feels like this never ends! Phase one: done. We’ve removed all the trees and most of the vines. Silver lining time: hubby did most of the work this weekend, too. 😀 He’s the best.
Who doesn’t wear a Coach hat while pulling vines? Well, I wouldn’t, except I found it on clearance at a TJ Maxx a few years back and never wear it except for gardening. I’m too fancy to function, right?

I’m happy to say I have actual before and after pictures that really show the amount of killer work we have (mostly the Mr. has) done.
The mountain, pile, — oh my gosh where did my house go?? What you can’t appreciate in this picture is how deep the pile was from curb-to-house. At least 10′.


We had the city come by for our one “big pick up” we get in a year. Praise the Lord that we get that service provided. I couldn’t even imagine who would be willing to haul that away for us (and how much it’d cost!)
The most “done” part of the yard is the wooden fence. This first photo is from a week before we closed on the house last July. Doesn’t seem to be a big problem, until you look at the second photo—

Say what?

Yeah, THAT’s what was hiding behind ALL of that. and THAT is what we had piled on the street for two weeks (sorry, neighbors! Thank you for not reporting us to the HOA!). SO much more sunlight pours into the yard now because all of that junk is gone. So excited to start working on the tree roots (those suckers go DEEP) and then start to transplant my veggies.
VEGGIE UPDATE: Habaneros- massive sprouts, haven’t gotten burnt again… yet. Tomatoes- almost ready to bear fruit (yep, it’s a fruit. haha). Herbs- taste delicious. Bell pepper and Eggplant- sprouted and beyond ready to transplant out of a plastic cup!
I like this whole “blogging” thing, but wonder if my little updates are a bit boring or not. What interests you? Do people even actually read “updates”? Or should I go more in-depth on how our home DIY projects are going (step by step w/ pics)?
Cheers!
The longest yard…makeover
Posted on: June 13, 2013
So this past weekend the Mr. and I decided to do a little demolition on the hottmess that is our back yard [making way for a larger vegetable boxes and eventually a greenhouse]. And boy did we cut off more than we could chew. We thought we could get it all (or even half) done in two days, but we barely scratched at 1/4…if even that much. But I’m so proud of the work he did. I say “he did” because I pretty much was just in charge of bagging vines and holding the shovel. I tried using the chainsaw on one skinny tree and nearly peed myself. Haha- a tree cutter I am not!
So to really convey how much work this yard needed from the start I’ll show some of our “before” pics. We bought our first home in July of 2012 after our first son was born. One old man (good ole’ Ralph) owned it since it was built in 1977, and in the last few years the yard got a bit out of hand. Overhanging branches, gutters filled with leaves, out of control vines, trees that have grown through their pots and into the ground. It’s nuts! But we knew that we got a FANTASTIC deal on her and with a little (a lot) of elbow grease we could make her look b-e-a-yootiful!
And by “elbow grease” I mean this

Ow ow! That’s my man making a beautiful yard for his wifey. Couldn’t be more proud of all the work he’s been putting in on out home.
Back to the yard…
I wish I had a really good “before and after” set for you. But it’s not done yet! We got rained out by the tropical storm that came through (gotta love Florida, right?) so the yard is in a state. Downed trees, piles of branches, holes in the ground… a bit of a disaster area, for now.
Where we started in July of 2012: (looking back at the big oak in the corner and my mommy)
Did I fail to mention there was also a prayer alter and a 15′ white picket fence to nowhere? Oh, yeah. There was.
Before:

After: (Eeek!) There’s still SO many more trees and shrubs that we want to clear out, but you see what I mean about the “state of disaster” that is our back yard.

Here’s my famous little herb box before we cleaned her out, planted silk flowers and all!

And an update on her today!

Grow my babies grow!
Anywho, we’ve still got a few more weekends of hard work before I’ll be able to post a REAL before and after pics and fill you in on all the details!
Cheers!
New name, new page!
Posted on: June 6, 2013
The Mr was to gracious as to sit down with me and work on my blog page. Though it’s still a bit bare in many places, we’ve got a new name and new layout! 😀 Thank you hubby!
Introducing “Purely Homegrown”… I love it! It completely fits our whole M.O: all natural, the way God made us. Like the new name?

Recent Comments